
When I was younger, I became obsessed with whales. I loved them. I searched for every organization and society I could find (this was a lot more difficult pre-internet) and wrote letter after letter searching for things to read and study after I had exhausted the library. It was really amazing how I was sent packet after packet of information that I placed in a very full binder. The plans for becoming a famous cetologist have passed, but my love for everything whale never really left. That was the inspiration for these t-shirts. One day, I just sketched up a couple of whales for a craft that never came to fruition, but I kept the sketches. Then, last week, I was searching for something I could make my little man- most crafting adventures seem to have distinct feminine tendencies- and I remembered the whales. They became simple applique tees. Do you need to use up some fabric scraps? You can make one too. Gather your template, fabric scraps, fusible webbing and a t-shirt (and have your iron and sewing machine on standby).

Make a copy of your image that you can cut up. I kept one whole for reference as well.

In the case of this Humpback whale, I wanted the pectoral fins to be a different color than the body, so I cut them off. I then had three pieces to my template that I measured up to my chosen fabrics to make sure everything was the right size and also so we wouldn't waste any fusible webbing- I'm cheap like that.

Following the directions on the webbing, iron it onto your fabric pieces. Then, using your cut pieces as a template, trace around the reverse side of your image onto the backing paper with a pencil.

Cut everything out and lay it all out on your t-shirt before you iron it. In this case, the fluke wraps around the side of the shirt so it is just hanging off the side while I fiddle with positioning.

When you have it just the way you want it, iron it on piece by piece starting with the largest part of your pattern. In this case, the body. Then add the fins one at a time.

This little tee didn't have any side seams so it was relatively easy to iron the back half of the whale and his little fluke under the arm.

To finish, use matching or coordinating thread in your sewing machine and zig-zag around the pattern. Be sure that you're not stretching the jersey fabric as you navigate around all the twists and turns. The trickiest part of this guy was the crazy mouth. You could write on a mouth with a water soluble pencil or just eyeball it. I think my little man loved it (or at least I loved it on him). This photo pretty much sums him up; He is a gentle, mild-mannered dreamer. I think he is looking for airplanes here.

If you would like to make your own whale tee- here is my original sketch. It's really rough, but it works. Just click on it for the larger size and save. If you do make something with it, I would love to see it!

My daughter really wanted one as well with the orca so I let her pick out her own fabrics from the stash... they were not what I would have chosen, but she loved them. This summer I have been trying to make a conscious effort not to be so rigid on the things I don't need to be. I figure, the house rules are pretty strict and everyone needs space to express themselves without so many boundaries so I have been trying to create opportunities to let her explore her own creativity without me butting in so much and curbing it. This is very difficult for me but this Orca is a triumph for us both- she picked some crazy fabrics, and I didn't try to make her choose something I liked better.

Yay for crazy pop-art Orca! Here it is all ironed on and ready for the zig-zag treatment. Can you tell it was really late at night by the fantastic lighting in the photo?

Here's the template for this one: Same drill. Click on the image and save or cut and paste; blah blah blah...

Here's the finished product:

Ooh, and maybe she can wear it with the
Killer Whale Hair Clippie from last year! I thought they turned out pretty cute and I'm so happy I finally got to use my whale doodles for something. Now I just need to make Lily one as well- I'm thinking a Sperm whale. Luckily, she's still too young to feel left out (am I a terrible Mom, or what?)


 When I was younger, I became obsessed with whales. I loved them. I searched for every organization and society I could find (this was a lot more difficult pre-internet) and wrote letter after letter searching for things to read and study after I had exhausted the library. It was really amazing how I was sent packet after packet of information that I placed in a very full binder. The plans for becoming a famous cetologist have passed, but my love for everything whale never really left. That was the inspiration for these t-shirts. One day, I just sketched up a couple of whales for a craft that never came to fruition, but I kept the sketches. Then, last week, I was searching for something I could make my little man- most crafting adventures seem to have distinct feminine tendencies- and I remembered the whales. They became simple applique tees. Do you need to use up some fabric scraps? You can make one too. Gather your template, fabric scraps, fusible webbing and a t-shirt (and have your iron and sewing machine on standby).
  Make a copy of your image that you can cut up. I kept one whole for reference as well.
 In the case of this Humpback whale, I wanted the pectoral fins to be a different color than the body, so I cut them off. I then had three pieces to my template that I measured up to my chosen fabrics to make sure everything was the right size and also so we wouldn't waste any fusible webbing- I'm cheap like that.
 Following the directions on the webbing, iron it onto your fabric pieces. Then, using your cut pieces as a template, trace around the reverse side of your image onto the backing paper with a pencil.
 Cut everything out and lay it all out on your t-shirt before you iron it. In this case, the fluke wraps around the side of the shirt so it is just hanging off the side while I fiddle with positioning.
 When you have it just the way you want it, iron it on piece by piece starting with the largest part of your pattern. In this case, the body. Then add the fins one at a time.
 This little tee didn't have any side seams so it was relatively easy to iron the back half of the whale and his little fluke under the arm.
 To finish, use matching or coordinating thread in your sewing machine and zig-zag around the pattern. Be sure that you're not stretching the jersey fabric as you navigate around all the twists and turns. The trickiest part of this guy was the crazy mouth. You could write on a mouth with a water soluble pencil or just eyeball it. I think my little man loved it (or at least I loved it on him). This photo pretty much sums him up; He is a gentle, mild-mannered dreamer. I think he is looking for airplanes here.
 If you would like to make your own whale tee- here is my original sketch. It's really rough, but it works. Just click on it for the larger size and save. If you do make something with it, I would love to see it!
 My daughter really wanted one as well with the orca so I let her pick out her own fabrics from the stash... they were not what I would have chosen, but she loved them. This summer I have been trying to make a conscious effort not to be so rigid on the things I don't need to be. I figure, the house rules are pretty strict and everyone needs space to express themselves without so many boundaries so I have been trying to create opportunities to let her explore her own creativity without me butting in so much and curbing it. This is very difficult for me but this Orca is a triumph for us both- she picked some crazy fabrics, and I didn't try to make her choose something I liked better.
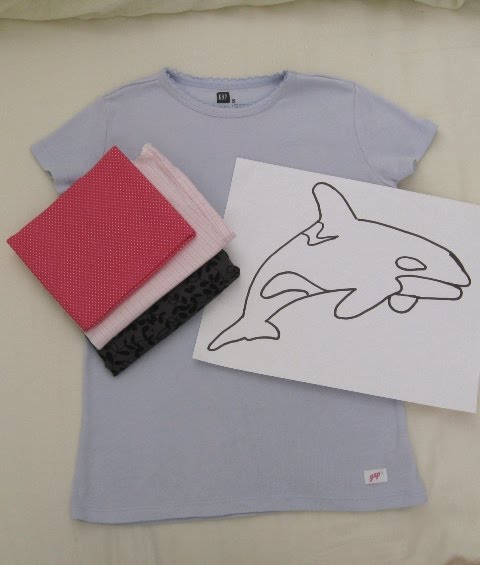 Yay for crazy pop-art Orca! Here it is all ironed on and ready for the zig-zag treatment. Can you tell it was really late at night by the fantastic lighting in the photo?
 Here's the template for this one: Same drill. Click on the image and save or cut and paste; blah blah blah...
 Here's the finished product:
 Ooh, and maybe she can wear it with the Killer Whale Hair Clippie from last year! I thought they turned out pretty cute and I'm so happy I finally got to use my whale doodles for something. Now I just need to make Lily one as well- I'm thinking a Sperm whale. Luckily, she's still too young to feel left out (am I a terrible Mom, or what?)


Those are fantastic! Gonna have to add it to my to-do list!
ReplyDeleteThese are so cute. Don't you just love when you can make something for your kids that they have fun with. I like that you added pink on one for your daughter. I want to let you know you were featured on Fabric Fun Thursday :).
ReplyDeleteThose are adorable and sweet!!
ReplyDeleteThey are sooo cute! I do love how the Orca turned out! And she is soo big!
ReplyDeleteholy cow, woman! You are talented. Those are adorable.
ReplyDeleteOK, I'm squeaking on how awesome this is, and I wish I could sew! I'm adding this to my list of things to share once I get back up on blogging...and don't think I forgot your Smurf party! :)
ReplyDeleteI cannot love this enough. My kids are SO getting these. Thanks for sharing your templates!!
ReplyDeleteThanks for the love, friends. Sorry I am so computer illiterate. My sis just showed me how to make PDFs so I'll try to update these templates soon. I would love to actually hear some squeaking... as in squeaking like whales? Awesome! Also, thanks for the feature, Kim!
ReplyDeleteThat turned out so cute! Really really fun project!
ReplyDeleteXOXO
Jen
Very cute!! Thanks for linking @Creative Itch's "Sew Cute Tuesday"!
ReplyDeleteAw, I **LOVE** those whales. That is incredibly sweet.
ReplyDelete