Showing posts with label gifts to make. Show all posts

03 June 2011

Last-minute Teacher Appreciation Gift

Here are some quickie teacher appreciation gifts that can be finished in just minutes! First, carefully disassemble a disposable tape dispenser.

Choose a piece of good quality, heavy, double-sided cardstock like this Amy Butler design by K & Co. and use the removed paper packaging as a template to recreate the appropriate pieces.

Reassemble. Then, embellish as you see fit. This one is about as simple as can be, basically, because it was really late at night and I was super-tired!

Add a nice message. (We added a hand-written addition on the back from my daughter.)

Then, because she was an Extra good teacher, we could not resist making her another little something. This is almost too easy. You just cut your paper down to size, fold it around (using a bone folder makes your creases extra crisp and neat) and stick. Add a label and insert your package.

This is seriously, a 3 minute project- tops! And as we all know, EVERYTHING and just about ANYTHING looks better wrapped up in pretty paper!


13 August 2010

Diaper Cake with Bonus Wreath

I made a diaper cake (or as we call them, nappy cakes) for someone Mr. PP works with and another co-worker asked if I would make one for her as she wanted to give one to a friend of hers. She provided the basic materials, and we all get to benefit! Isn't that ribbon cute? I love the gender-neutral colors! Anyway, they are SO easy to make so I thought I would share the basics, although if you google the term, you will find a ton of great ideas! You can leave them plain like I have here, or embellish by tying and poking in all kinds of things a new mother may need. Here are the things you need although you will probably need more than one package of nappies- I used one and a half for this cake:
Were you wondering what I was doing with all the random kitchen vessels? They were all the sizes I wanted for my cake and it is so much easier to use a "mold" than to try to tie them all together without one!
To begin, take your nappies, 1 at a time and roll them up tightly and secure it with some tape or a small rubber band. Then place them in one of your round "molds". Oh! I forgot to include "tape helper" in the materials shot. As anyone who has ever wrapped a gift can attest to, a "tape helper" is an indispensable tool. It's one of my daughter's favorite jobs.
After you have squished enough in, tightly tie them all together with some ribbon or twine.
Continue the same way until you have all of your layers made:
Then, the fun begins: Tie your ribbon around the layers to hide the twine and embellish as you please. This one was left plain for our friend to finish but there is something nice about "simple" I think.
I did add a few flowers because they were so yellow and happy making.

BONUS: I had a half of a package of nappies left over from the cake project so I made a wreath with the left-overs. These are even easier! The best wreath form for these are simple cardboard ones. You can trace one you already have or just trace around round objects you have around the house. The outside diameter of this one is 10 inches- they will be quite a bit larger (and heavier) when you get the nappies on so keep that in mind when you choose your size.
You will need some lengths of skinnier ribbon for this as well. So, to begin, wrap your nappy around the form and tie a ribbon tightly at the top. In hind-sight, I think I would have faced the white side toward the front instead of the printed side.
Overlap your next nappy by about half and do the same as the last and so on and so forth.
To make an easy hanger, just staple a ribbon to your cardboard form and cover it with a nappy.
So simple and really easy to embellish with sample sized baby products, small toys, feeding accessories, the baby's name, etc. I love these because they're easy, they always turn out and you can tweak them to fit any baby shower theme and gender! Plus, these make easy, useful shower decorations. Have fun creating! I'd love to see what you do/have done so hook a girl up with photos and links!

Linking to:


Join  us Saturdays at tatertotsandjello.com for the weekend wrap up        party!

03 August 2010

Cake Mix Cookies and Cute Packaging

One night, I needed some cookies. I mean, I NEEDED some cookies. Some nights are just like that. At the end of my twin pregnancy, I was gaining 2-4 pounds of water and baby weight PER DAY. Everything else was going well on paper, but I couldn't walk; couldn't even bend my knees or close my legs for that matter and was on total bed rest, or should I say, chair rest because I couldn't sleep on a bed due to the legs thing (again, with the water). If I tried to turn on my side, one leg would have to be totally up in the air and that was just plain silly. I ended up giving birth at exactly 200 lbs. I am normally right around 100lbs so that tells you something! Here is a photo- we had to take it quickly before I collapsed- notice the legs; that was as close as they would go together. Oh my, did I actually just post that? YIKES! It was probably the worst physical time in my life up to that time and what I craved more than anything was cookies. Now, I don't mean any store-bought kind! Oh no! Those would not do! I needed them to be hot out of the oven, home-made cookies. Ever since then, from time to time, I CRAVE cookies... NOW! Last week, we did not have the right ingredients for good homemade cookies so I had to improvise. After scouring the internet, I mixed up a few and came up with these semi-homemade cake mix cookies. Super simple and made it in-and-out of the oven fast! Here's what you need:Any cake mix- my daughter adamantly insists on Funfetti- but any flavor should work.
1/3 cup canola oil
2 eggs

Preheat oven to 375 degrees. Mix all 3 ingredients and drop by teaspoon full onto parchment lined cookie sheets. Give them a bit of a pat on top to flatten them slightly and bake for about 10 minutes. Easy peasy! Fresh baked cookies! Now these will not be the best cookies you have ever had- they are, after all, from a cake mix; but they are better than anything at the store!

So, earlier this week, we found out Abby's little friend is moving from about 7 houses down from us to about 4 houses down from us. We wanted to bring them a moving-in gift and Abby absolutely INSISTED on the Funfetti cookies. It was really last-minute and I needed some cute packaging and then I remembered these DARLING Pringles can makeovers at Bayberry Creek Crafter I have been wanting to try and I happened to have just such a can all cleaned out and ready to go! Her's are just darling and mine don't do her's justice, but the intent was there! I love finding great ideas through awesome crafty sites!
I happened to have some paper that was already printed two-toned from Creative Memories so all I did was measure, cut and add some ribbon and a tag. Looking now, I sort of cringe as I should have added some punctuation, but oh well, we were in a time crunch!
We filled the decorated cylinder with our cookies and took them to their destination.
Here they are... isn't this cute? (There is an equally cute family right behind her as well).
Welcome to your new home- now even closer!


Linking to:
Show and Tell Green

24 July 2010

Find and Make Your Own Box Templates

So, here is the post I contributed to 733- A Creative Blog's annual Creativity Week. I'll leave the intro for those of you who are new or who are visiting for the first time! Welcome and I hope you find something useful!

My name is Bethany and when I am not running after my soon-to-be first grader or 20 month old twins, I like to rest or watch Days of Our Lives or eat things-obviously there is chocolate involved- but I usually don't do those things. Usually, during nap time or late at night, I pretend like the house is in perfect array; the laundry cleaned, pressed and put away; lawn mowed, dinner finished and there is nothing else to do but make and do crafty things. Those things- the good, the bad and the REALLY bad- I post on my blog, The Paper Pony. Do you find it difficult to find just the right box and packaging templates? For some reason, I can never find the templates I need, or they cost money, or I can't download them or some other issue. To remedy this, I started saving the packages of things we bought and started turning them into templates and it was super-easy! I might even have been known, on occasion, to buy a product just for it's packaging. And now, I have a selection of packaging options. So, here is how to turn these:
...into THESE!! (note: I left them fairly plain because I wanted to show how the boxes look at there most basic... oh, and the fact that I am TERRIBLE at cute embellishments- you should see my attempts at making cards!)
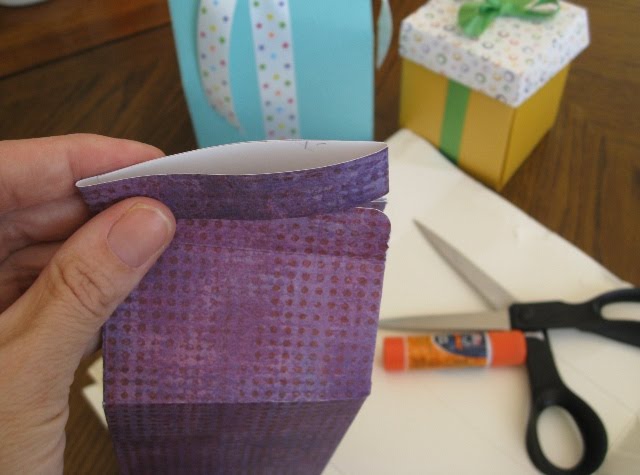
So, first, you carefully take your box apart. If there are glued seams, I usually just tear as carefully as possible. You will be using a ruler in the process, so if you tear a couple of things, it's no big deal.
Lay the box open flat and study it so you understand how it works. I like to do this first so as I attempt to recreate it, there are fewer mistakes. Then place it on the "wrong" side of your chosen paper.Trace all around the outside with a pencil so you can erase it later if you wish.
Then, carefully bend each crease back that you can and trace those as well. It is important during this step to use a very sharp pencil and line everything up precisely.
Do the same with the lid...
Then, using your ruler, straighten up the edges and draw in the lines you missed or couldn't mark by bending back. I use dashed lines to indicate folds to which I need to pay particular attention or those that go opposite ways.
After you're happy with your traced image, cut out and fold using the original package as your guide. The original has the folds intact and it makes it so much easier to recreate when you know which way everything is supposed to go. Great for visual and hands-on learners like most of us creative people are!
Then, glue where you need to and put it all together. In a lot of cases, you might find it easier to embellish before you glue everything together.
Here's the final project!
Sometimes, the tracing method can be more difficult with certain kinds of packaging. Especially if the box is awkward or requires some odd cuts or is a "two-parter"; that is a package that is too big for one piece of paper and you are required to make it in two pieces. Like this box, for example.
I used the "trace" method and was running into all kinds of trouble; partly due to a dull pencil and the fact that it was really late at night, and also because it is just an awkward box and required some odd cuts with a craft knife. Just look:
Not pretty! It was much easier to just scan and print onto card stock. Most packaging is white on the inside so you will need to adjust the brightness and contrast. Also, it helps to back it with a colored piece of paper. I like to add notes as well so I know what I'm doing. Here is what I did with this one so you can click on it to enlarge, cut, paste, print and make it yourself!
Here's the final result!
One more note! You may need to adjust the top openings so you don't have to glue them all shut like their originals are. For the cream carton, I flattened out a simple loop and slipped it over the top to keep it closed until I have need for it. The ol' "punch a couple of holes, thread ribbon and tie a bow" method also works well in a lot of cases.
So, here is what I ended up with! I kept all the original templates and put them in a big folder so now, I have a bunch of options when it comes to cute boxes AND a great excuse to buy some things I might not normally get. "I HAVE to HAVE this BOX!"
Related Posts with Thumbnails